This is the second installment of the review of a recent Costa Ludus handgun course a Trained and Educated Responsible Armed Citizen attended (HE02) in Myakka, Florida early last month.The author (initials E.D.) is a patriotic citizen who never wore a military or LE uniform. He is an ardent and serious shooter (I hate the term 'firearms enthusiast', as though something revolving around deadly force is a quaint hobby) who is a strong supporter of the military, serving on the board of 1/75′s 1ST Ranger Battalion Sua Sponte Foundation.
He may not be a hardened gunslinger with multiple tours overseas, and he obviously doesn’t represent all civilian shooters, but he is a great example of a TEARC and he’s certainly no Gecko45.
Refresh your memory with part one: https://kitup.military.com/2012/12/op-ed-review-armed-citizen-costas.html
Luckily, the night between Day One and Day Two during the actual class didn't seem to be nearly as long as the gap between Part One and Part Two of this article. I guess since there were no meteors or solar flares and neither Galactus or zombies showed up we might as well run it. DR
"...A blast comes from the shotgun and the manager’s shirt goes from white to crimson before he even hits the floor. You hear the killer rack the Mossberg and dispatch the teller. Screams and panic grip the civilians around you on the floor. The shooter then begins to head your way. What do you do? Do you have the training necessary that provides you with the skills and confidence to bring a resolution to this event if or when you deem force necessary?"
Day 2
The second day started with a review of the safety rules. We moved downrange and hit the ground running.
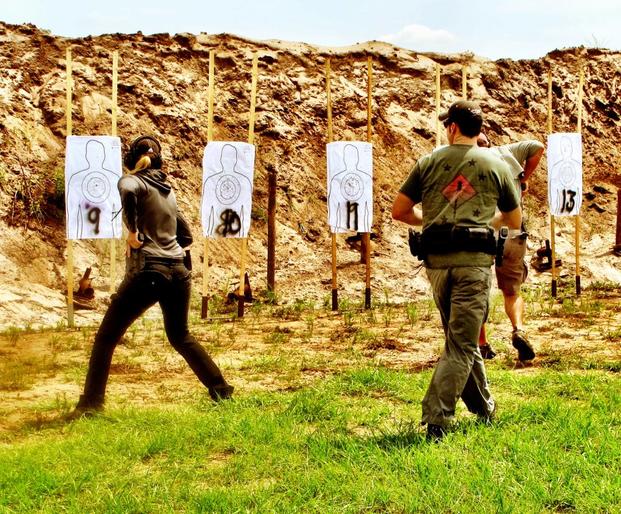
After another warm up, this time using VTAC targets, Costa gave a brief on “instinctive shooting.” Like it sounds, instinctive shooting is shooting without a sight picture. To ensure no one was trying to 'game it', we all taped over both of our sights with masking tape and the training block began.
The majority on these drills were done two handed from the compressed ready position. While looking at the target, we punched out and fired at the A zone from about the three yard line. We then moved back and shot volleys from the3 5, 7, 10 15 and 25 yard lines. It is amazing how the mind can still make shot placement possible without the use of sights. Results for the class overall were mixed. Based on the targets I witnessed, the majority of the folks were able to produce some great groupings from about 15 yards and in. Some struggled with the overall concept and it was reflected on their targets.
With the basics of instinctive shooting covered, we moved once again to shooting from various positions. The segment was completed after we did a 'Walk back drill'. Shooters started at the 3 yard line, fired a group, then moved back to the 5, 10, 15 and 25 yard marks. When the shooter became uncomfortable with the groups at a specific yard line, the front sight tape could be removed. Every student’s front sight tape was to be removed to be removed at the 15 yard mark. All tape was removed by the 25 yard mark. Instinctive shooting is used when things go south fast in close quarters and a sighted shot may not be possible. It’s not for plugging a running man at 40 yards, rather for 10-15 yards and in. It was assuring to know that we could make vital shots instinctively if it were to become necessary.

We also discussed shot placement. A shot to the head can stop things fast. However, that's not the easiest shot to make under duress or at distance. There is also the possibility that it might be obscured. So we discussed shooting the chest or pelvis or even the leg/foot regions and “working” a target with multiples to gain advantage. Simply put, shoot what is presented and continue to engage the target until the threat is eliminated.
After a quick break for lunch on the range (and some great cookies from Miss Angie), we reloaded and began the next block of training. The afternoon would be spent working from the draw and working manipulations.

We began with the basics, a simple two handed draw while standing at ranges between 3 and 25 yards. Then, kneeling was added. All that seemed simple enough. We then moved to urban prone, then flipped over to supine. Since the draw gets a bit more complicated when on the ground, Chris emphasized safety and going slow. When on the ground it is imperative that each shooter is aware of their muzzles. For example, when drawing with you back on the ground, it would have been easy to flag our own legs or feet as we began to move on target. Costa demonstrated how to move your weapon side leg out of the way as the draw begins and then sweep it back into a spread position once on target to give the shooter a solid base to shoot from. We moved thorough this material fairly quickly and it appeared that other shooters had a firm grasp of this already.
Once it was clear we understood the process with two hands we began to learn proper techniques for one-handed weapon- and reaction-side draws. The majority of the remaining drills were one handed. Weapon side is self-explanatory. Reaction side on the other hand is a different animal altogether.
Most of the shooters chose to put their weapon side hand in their back pocket while practicing reaction side presentations. Chris stopped the class and reiterated muzzle discipline and being safe. If rushed, this drill would make it very easy to flag your fellow shooters as you draw.
Reaction side draws are a multi step process. Using your reaction hand, you reach across your body and remove the gun from the holster. Body mechanics make it so the weapon is now inverted in your hand. Once clear of the holster the shooter can utilize one of three options.
The holster spin: simply turning the pistol while it remains about 2/3rds of the way in the holster and getting the proper high tang grip. The shooter then presses out to target and engages.

The leg pinch: seemingly the most popular option, you clear the holster and the shooter places the weapon between his/her knees and pinches it there momentarily, being very careful to have the muzzle safely facing the ground and not sweeping any body parts. The reaction side hand then inverts and a normal high grip is placed on the weapon. The weapon is then punched out to target and shots are fired.
The chest- or belly-roll concept: Here the reaction hand pulls the weapon from the holster, places the gun sights on their chest and then rolls the gun over and re-grips the pistol. This is more easily done with chest rigs on as it provides a base from which to work and cants the muzzle away from the student. Personally, while standing, I chose to use the leg pinch method because as a civilian, I find find myself in a suit not a chest rig or plates carrier. It also was faster for me for the most part.
Presentations were conducted in every position. Kneeling provided the student additional options for reaction side draw. He/she could use the knee pinch method or simply ground the gun, roll it over with muzzle pointed down range and then press out to engage the target.
Urban prone was a little more complicated. As usual, the weapon side draw was not an issue because it is much the same basic draw procedure on a different plane. Once again, however, reaction side became more complicated. We practiced prone facing the target (head toward target) and facing away from the target.
To draw reaction hand, with your head facing the target, the shooter must first roll to the weapon side onto their backs. Then the reaction hand reaches across the body and draws the weapon and used the chest roll method to reorient the gun in the reaction hand. Then flip back over into prone and press out and fire. Seems fairly simple. But if you haven’t done it before its more complicated than you would think. When we began it was slow and awkward. As we got more and more reps in, the speed picked up as we gained confidence and familiarity with the process.
Its one thing to drop into prone and fire. But then getting back up with a weapon in your only usable hand safely and putting yourself in a position to fight your way back up is a different story altogether. Some people literally had to use their heads to push there way back into a position that would allow them to gain the balance necessary to regain their footing.
We also covered the weapon and reaction side draws from the supine positions.
Draw covered, Costa ran us through a series of drills that tested our ability to draw with either hand and move from standing to kneeling to prone and back. Pretty sure he covered just about every variation in stance and draw that was possible. For example, "Shooters, this time, reaction hand, 3 rounds prone to the pelvis, 3 rounds kneeling to the chest, 2 rounds to the head....get your hits......BUST ‘EM!”
It was now time to move on to malfunctions. We covered slide out of battery, failure to feed, failure to fire and stove pipes. We began to work through each of these problems with two hands. It was pretty apparent that the class grasped those solutions as they are presented in just about every other class out there. So we didn’t spend much time there. Instead, we spent time doing what other classes generally don’t - clearing malfunctions and manipulating the weapon with one hand in every conceivable position.
Chris explained and demonstrated how to rack the slide off your kydex, your pants, your pockets, your belt, the soft ground, a table, a car or concrete just to name a few. He showed us different techniques for ripping out a jammed mag as well. We learned methods to lock the slide back one handed, how to release the slide one handed without the slide release. Sure, I had seen some similar things in other classes. In some cases we did them once or twice. But this was the first class that I have attended that we practiced multiple solutions to multiple problems with one hand in multiple positions, with plenty of repetitions.
Costa demonstrated one particular method for racking the gun one handed that I struggled with. I blame it on small hands, but it happens, and that was agreat thing about this course. I didn’t learn one method, I learned several that I could apply in varying situations. At the end end of day two, I had been provided with multiple options on how to solve any given problem and I could choose what worked best for me.
This was hard stuff. It was mentally draining as well because we all knew that one bad decision could lead to you putting a round into yourself, or worse, a fellow shooter.
The day ended with a quick timed steel challenge. Students were told to have one round in the pipe, 9 in the mag and one extra magazine fully loaded.
Four targets were set up maybe 15 yards away or so from the shooter. Two targets were directly to the shooters front. One was off to the shooters left shoulder and one was at a angle to the shooters front right position. On the buzzer, the shooter was to draw, engage left target with 5 rounds, switch to the far right target on an angle and engage with 5 rounds. Dump empty mag, reload and then put 5 rounds on each of the remaining steel targets. A clean run with lowest time won.
It's always amazing how a little timer and 23 people watching can mess with good shooters. Most of the students failed to shoot the fairly simple stage cleanly, yours truly included. I threw one shot on each of the first three targets due to poor trigger control. The winner ran a Glock with an RMR and smoked the competition. Since everyone was fairly disappointed, we ran the stage one more time. Times were greatly reduced and most students cleaned the stage on the second run
At the beginning of the day, I'd felt like everything was awkward and slow. I am sure Chris was wondering what he was getting into as he watched us fumble and bumble our way through a drill. But, as the day progressed, what had been a slow mess became fluid and fairly easy. What seemed complex and awkward had become second nature. While I can’t speak for everyone, I think it is safe to say that we all had come a long was as shooters.
Another great dinner was served in the lodge and afterwords many of us headed out to sit by the bonfire outside for a cigar and a few drinks.
Day 3-Putting it all together
Everyday began the same way. A hearty breakfast, safety brief, repeat 4 rules of firearms safety as a group, jock up mags and dress the line.
For me, day three was a lot simpler. I'd lost my fear of shooting and manipulating my weapon system one handed. My main issue was reaction hand trigger control. As I sent round after round downrange with my reaction hand, the trigger control I had been searching for began to emerge and my groups began to shrink. Further, I had gained confidence because I knew that I had been given the skills to find a solutions to most problems.
We began with another warm up utilizing all the positions and skills we had learned over the past two days. Again, started up close and move from the three back to the 25 yard line. As a class the groups were clearly improving. Most targets showed large gaping holes in the head, chest and pelvis areas.
We began a block on Reactive Movement. In basic terms, here is what goes on....We hear a noise that alerts, we turn to see the threat, we make a determination whether to use force, we explode to a position of advantage and take the shots necessary to end the threat.
The drills included exploding right, left, front and to the back and firing rounds into single and multiple targets.
The drills were then modified to allow us to move in close quarters or around others. We would face right, left or with our backs to the targets in a line. Costa would yell “THREAT” and the student on one end of the line would turn, in his own space and shoot. Once the next student saw the preceding shooter begin his course of action, he/she could them turn, identify the threat and engage their target. Drills began from the left side, the right side and even a split from center. We ran these two handed and one handed, all from the draw.
These drills really make you think about your muzzle discipline because you are drawing a weapon inches from another person. That’s the way its going to be in a crowded movie theater or mall, so its important to make sure you learn how to do it safely.
Quick lunch break.
Post lunch, we shot a few series of the Dave Harrington “Iron Cross” Drills from a standing and kneeling position. (Readers can check out YouTube to see what they're about.)
Costa then moved on to our final evolution; running and shooting drills. Obviously, its better to run around with your weapon in your holster. But that is not always an option. With that in mind Chris went over position SUL and High Port. We discussed using two hands, reaction hand only and weapon hand only. Students were explained and shown options as to how we can safely run with a weapon.
While were being briefed, the RSOs of RCR, Ron, Dave and Chief (thanks fellas) set up a 5 position shooting course for the class to run. This is another benefit to training at Rocky Creek Ranch - you waste no time. RCR has volunteers that set targets and stages up for the students. This saves time and gets you more time on the line.
The stage was set in a typical “V” formation. The first and last shooting points were approximately 20-25 yard line each with to VTAC targets. The second and fourth firing positions were placed about 12 yards out with two targets respectively. The middle (3rd) firing position was up close and personal with four VTAC targets.
On Costa’s go, the student would engage the first two targets and then move station to station while on the run. How many rounds on each target was up to the student but a min. of 2 rounds were required on each. Mag changes were up to the student as well.
After the “V” course was run a few times, we wrapped it up and headed back to the lodge for a recap and certificates.
After Costa gave a brief recap, each student was given an opportunity to brief the class what they learned. Chris then handed out diplomas and coins to all the participants.
Back to the opening scenario:
You are laying of the floor, your right shoulder is out of commission, your weapon is on your right side. The bank manager’s body falls to the floor just 20 yards to your right side. The teller then falls 15 yards to your front. Because of the angle the shooters torso is blocked by the table that just filled out your deposit slip on. It appears the madman is now making a move toward you and your fellow citizens, racking his shotgun and to leveling it in your direction.
If you make the choice to take action with your conceal weapon, do you have the skills necessary to realize that that table is blocking his line of sight to you but exposes his pelvis and legs? Do you understand proper shot placement and angle of attack? Would you have the wherewithal to observe not just the target but the targets background in case your shot misses its mark? Do you have the training that allows you to flip over, draw with your left hand, roll your weapon across your chest, get a proper shooting grip and engage the shooter? Would you think to engage the shooters pelvis or legs and then continue to fire when the torso and head are now presented as he collapses? How about the ability to get back up one handed, reload and scan the room to see if the dirtbag had a buddy?
Have you ever practiced anyof that?
I will go out on a limb and say most haven’t, nor will they. Its not sexy, its not easy and its can be very dangerous. But I can tell you this, there is now a collection of 24 civilians, LEOs, private contractors and military personnel who are now better equipped to handle such a situation.
This class is not easy. It isn’t for folks that are new to shooting. However, if you have a solid base to pull from, possess the desire to get better and want to attack your weaknesses, then you will learn a ton from this course and walk away a better shooter.

Before taking Costa HE02, I was willfully negligent. I figured when the bank scenario happens to me, I would just figure it out on the fly. I kept telling myself that I had the basic skill set and I knew the fundamentals. Since I would finish in the top part of almost every class I took, I'd convinced myself that I was really that good. I even practiced them far more frequently than others. But when I practiced, I took the 80/20 rule to heart. I worked on the easy stuff most of the time and the hard stuff 20% of the time. I even took classes to try make myself better and “challenge” myself. But you cannot “revert to your training” if your training never covered any of those unconventional situations. I learned more in the 2300 rounds I fired at this class than the totality of what I'd learned in the last several years. If you have the desire to learn and expand your skill set, I highly suggest taking this class with Costa Ludus. I have Chris to thank for making me a better shooter, a more prepared shooter and for snapping me out of a poor training routine.
E.D.
The author works as a financial professional to afford ammo and shooting classes. He has actively sought out training over the last 20 years and attended many of the of top shooting schools in the county. Is he a flawless shooter? Absolutely not! But he is striving to improve and learn more everyday. He also gives back to his community by serving on the board of the 1st Ranger Battalion Sua Sponte Foundation, Inc.
")
")
")
")
 conducts flight quarters while transiting the Pacific Ocean, Nov. 6, 2023. (Evan Diaz/U.S. Navy)")
")
")
")
")